Some days thing just don't work out the way you planned. It's the same in photography. You might want to get some photos of the kids but they'd rather run away, or pull silly faces. You might plan to photograph a waterfall but it's raining or there's no water. So maybe it's time to give up, find a cafe and order an espresso. Or you could just go with the flow...
A while ago I had a day home with my daughter. We had spent a while a few weeks before taking photos with her jumping on her bed and I was quite happy with the results, especially with a high ISO and short exposure time:
... but I wanted to give it another try, especially as there were a few things I wanted to improve (notice I missed part of Sarah's right hand in the photo above). However, things didn't really go to plan. The first batch of photos were OK but the sheet I hung up to make a plain background wasn't smooth enough and made for a distracting background:
... and after a while Sarah (understandably) got tired, lost interest and decided to "have a rest". Give up or keep taking photos? Well, I decided to take a few more shots, and got one nice one:
Sometimes it pays to go with the flow!
So if your kids decide they'd rather make silly faces than be sensible and smile nicely, take the photo anyway. You'll get some photos that at least they will like, will capture how they actually were at the time and can probably catch them between silly episodes in more natural, 'honest' situations. Like this one:
When taking a picture, think about what it is that you want the viewer to see. Why are you taking the picture? How are you going to emphasise the subject?
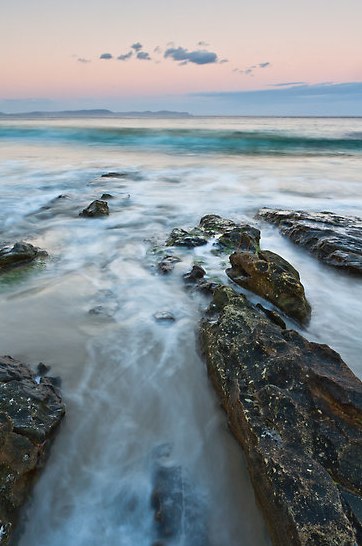
Minimising distractions is a good thing to try but you can also use leading lines: things in the scene to draw the viewer's eye in to the subject. Here are a couple of examples.
The first one was taken at sunset on Bruny Island. I had my camera on a tripod, quite low down and just at the limit of where the waves were coming up the beach. There were some rocks with straight edges going down toward the waves so I put the camera between them. The rocks frame an open triangle pointing into the picture and hopefully lead the eye to the breaking wave and the land on the horizon. Something else that helps here is the long exposure (a few seconds I think). As the water rushes out it leaves foam and bubbles that blur and also create lines to lead the viewer's eye.
Sunset at Adventure Bay, Bruny Island
Here's another one of the kids (quite a while ago now!) riding their bikes in a park. This park has a curvy 'railway line' painted on the path. Curved lines are great for creating interest and again, getting low down and making the path run up from the bottom of the frame leads the eye in. Note also that Patrick is at the intersection of two one-third lines (the rule of thirds again!). This one was taken with my iPhone and then just a little tweaking later on to darken the foreground a little.
There's an interesting article by Nick Melidonis in the current issue of Better Photography magazine (no 67, p 94) on the artistic effect you can get with long exposures and deliberately moving the camera while taking the picture. It's a great way to simplify the image and emphasise colour and structure, well worth a read. Anyway, I thought I'd give it a try.
We too a trip to Mt Field National Park recently and took a walk to Russell Falls. I had my iPhone with me and had been using the SlowShutter app to take a long-exposure photo of the falls. On the walk back down the path I decided to try a long exposure while walking. The photo below is an 8 second exposure. All I did was try to keep the point where the path disappeared into the distance at the same place. Anyway, I was pretty impressed with how it turned out. A small amount of editing was done using another app called Filterstorm to increase the contrast a little and saturate the colours.
One of the great things about this is that because the idea is to use movement to make the picture, you don't need super-good camera gear. A small camera will do a good job too.