Jim Lovell is a landscape photographer based in Hobart, Tasmania. Jim's recent work has been focused on capturing the essential elements of the Tasmanian landscape using long exposure techniques.
When taking a picture, think about what it is that you want the viewer to see. Why are you taking the picture? How are you going to emphasise the subject?
Minimising distractions is a good thing to try but you can also use leading lines: things in the scene to draw the viewer's eye in to the subject. Here are a couple of examples.
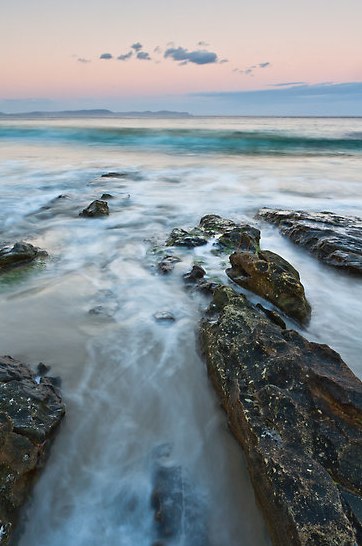
The first one was taken at sunset on Bruny Island. I had my camera on a tripod, quite low down and just at the limit of where the waves were coming up the beach. There were some rocks with straight edges going down toward the waves so I put the camera between them. The rocks frame an open triangle pointing into the picture and hopefully lead the eye to the breaking wave and the land on the horizon. Something else that helps here is the long exposure (a few seconds I think). As the water rushes out it leaves foam and bubbles that blur and also create lines to lead the viewer's eye.
Sunset at Adventure Bay, Bruny Island
Here's another one of the kids (quite a while ago now!) riding their bikes in a park. This park has a curvy 'railway line' painted on the path. Curved lines are great for creating interest and again, getting low down and making the path run up from the bottom of the frame leads the eye in. Note also that Patrick is at the intersection of two one-third lines (the rule of thirds again!). This one was taken with my iPhone and then just a little tweaking later on to darken the foreground a little.
Something that took me a while to get used to when moving from film to digital was that it no longer costs anything to take a picture. That's a great freedom. With digital photography you're free to experiment with different compositions, camera settings, lighting etc. As you do this, you learn what works and what doesn't and the experience pays off. So the hint this week is to just take lots of photos!
The other benefit is that when you've got a moving target or targets, like a family group, you can just keep taking photo after photo. Many of the resulting pictures will be poor with someone squinting or pulling silly faces, but chances are there will be some good ones too. So keep the good ones and discard the rest. Easy.
A selection of photos taken of my 4 and 6-year old kids recently. The 'hit rate' was pretty low: I was happy with only a few of the 30 or so photos taken. But that's OK, I can delete the ones that didn't work and it costs nothing.
When we take a photo, we tend to concentrate on the main subject and not think too much about the surroundings or the background. Then, later on we look at the picture and realise we placed Uncle George right in front of a lampost and it looks like it's growing out of his head! Similarly, when taking a landscape photo, we might be concentrating on getting a good picture of a mountain but not notice the garbage bin in the foreground. This hint is all about avoiding these situations.
Some of the best images are the simplest ones, with nothing to distract from the subject. A painter has the option of leaving things out from a scene by simply not painting them. In photography, the camera captures everything, so it's necessary to make the camera see just what you want and leave out the rest.
There are various ways to achieve this. If you're taking a photo of a person, you can put them in front of a plain background or set the camera to a large aperture (i.e. a small f number) so that the image will be in focus on the person's face but the background will be blurred. Like this:
In this photo I've used a plain background (a grassy bank) and made it even less of a distraction by using a large aperture to throw it out of focus. Your camera may have a portrait mode which will attempt to do this for you automatically. Or you can use aperture priority and set a wide aperture (check your camera manual) . If you have a zoom lens, use a long focal length (zoomed in) as this will also help keep the background out of focus. Be careful though not to make the aperture too wide as you might find only parts of the subject's face are in focus. In general, portraits need to have the eyes in focus at least.
For landscapes you obviously can't move the subject, so you have to move the camera to a good location. When framing the picture, look for any distracting objects and move around or zoom in a bit to try and avoid them. For this one, I wanted to capture a still misty morning on Dove Lake near Cradle Mountain:
Dove Lake, Cradle Mountain
If you have a tripod, you can experiment with longer exposures. This can have a very nice effect on water or cloud, smoothing it out and simplifying the image. Sometimes the bright or contrasting colours in a scene can be a distraction. Try converting the image to black and white.
Sometimes foreground objects are great for providing context or for leading the eye into the scene, in which case you want to keep them in but have them in the right place. That's a topic for another time...